The general cheesemaking process:
(Taken from The Cheesemaker's Manual)Warming the milk
Ripening the milk
Additives
Coagulation
Cutting the curd
Cooking and stirring
Washing the curds
Draining
Cheddaring
Hot water treatment
Seasoning
Salting
Pressing
Waxing
Aging
Tasting and enjoying
When you make a cheese, you should keep a record of each step. For a form that I use click here.
This column shows the steps generally used in making a "hard cheese" such as Gouda, Jack, Parmesan, Cheddar etc. There are, of course, differences even among these cheeses, and, not all cheeses need all these steps, so study your recipe well.
This column has links to Quicktime movies of each major step in the making of a Spanish Manchego cheese. This is a relatively easy hard cheese that illustrates many of the steps well.
The recipe can be found in the recipes section of this web site.
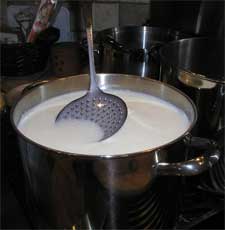
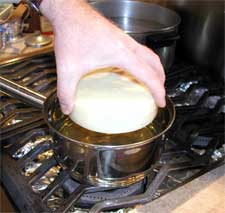
Warming the milk
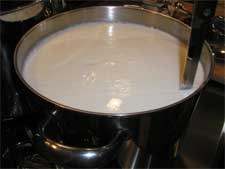
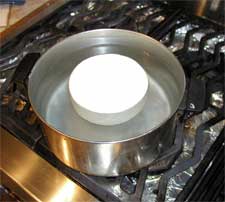
The milk called for in the recipe is warmed to a temperature appropriate for the culture that will be used. This is often done in a "double boiler" fashion, by placing the pot of milk in a larger pot, or sink, of warm water. This process must be done slowly as the quality of the cheese depends on slow warming in this and subsequent steps. The highest available quality of milk should be used. It is possible to use goat, ewe or cow's milk in any recipe, although most recipes call for a specific type of milk.
If you have access to raw milk, you should pasteurize it first and age any cheeses you make for at least 60 days. Avoid milk that is labeled as "ultra-pasteurized".
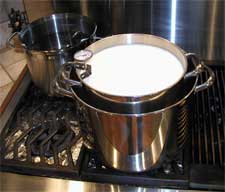
Warming the milk in a double boiler. Notice the pot in the background with boiling water in which I sterilize my utensils, molds, etc.
Introduction (19 seconds, 664K)
Preparation (43 seconds, 1.4MB)
Warming the milk (30 seconds, 1MB)
Prepare the lipase (52 seconds, 1.7MB)
Regulating the milk temperature (47 seconds, 1.6Mb)
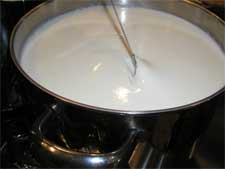
Ripening the milk
Either naturally occurring lactic bacteria or added bacterial cultures are used to acidify the milk through the digestion of lactose (a sugar) into lactic acid. The use of direct set cultures helps ensure consistency across batches. The correct temperature of the milk, as called for in the recipe, must be maintained during the ripening process.
Cheeses that are prepared at lower temperatures will tend to use mesophilic cultures. Cheeses that call for higher temperature cooking call for thermophilic cultures. Of course, there are hundreds of cultures that are used in commercial cheesemaking. The home cheesemaker can benefit from prepared direct set cultures from the sources listed on this site.
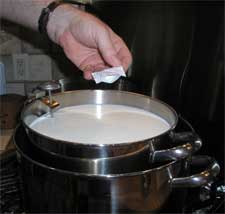
Here I am adding one packet of direct set culture to the warm milk. I sprinkle it on top, wait about 5 minutes and then gently whisk it in.
Gently whisk the culture into the warm milk until it is well combined. Then cover and allow to set for the time prescribed in the recipe.
Adding the cultures (61 seconds, 2MB)
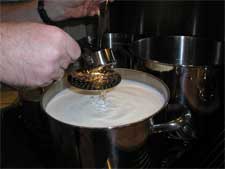
Additives
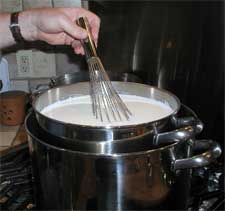
Once the milk has ripened, you can add other ingredients that may be optional or may be necessary for a specific type of cheese. These could be: coloring, additional cultures, calcium chloride, or lipase (for flavor in certain cheeses). These must be added one-at-a-time prior to adding the rennet. They are usually diluted in a small amount of cool bottled water prior to adding them to the milk. And, they must be well incorporated into the milk by stirring gently from bottom to top.
I always add liquid calcium chloride to my cultured milk if the milk is store-bought. This seems to create a firmer curd. Just dilute the CaCl in 1/4 cup of cool bottled water, then pour it into the milk through a strainer or ladle. Use an amount of CaCl equal to the amount of rennet you plan to use.
Then stir it in gently with a cheese ladle using a bottom-to-top motion.
Adding the lipase (33 seconds, 1.1MB)
Adding calcium chloride (49 seconds, 1.6MB)
Coagulation
During this step, the milk turns into a solid curd. Rennet is usually added to create this reaction which can take 30 minutes to 24 hours. The minimum amount of rennet that causes the desired reaction should be used. It should be diluted in some cool bottled water prior to stirring it into the milk. It should be combined well, but do not stir for more than a couple of minutes. If substituting goat or ewe milk for cow milk in a recipe, decrease the rennet by 20%. The pot temperature should be regulated and kept constant during the renneting process, and the pot should be covered and left undisturbed.
Some cheeses are coagulated without the use of rennet (or with the use of very small amounts). In these cheeses the coagulation process is produced by lactic bacteria turning lactose into lactic acid. Most cheeses, however, do call for the use of rennet to compliment and speed this process.
Another form of coagulation is direct acid addition to the milk. Vinegar, lemon juice or citric acid may be added to the milk to force coagulation in heat-treated milk.
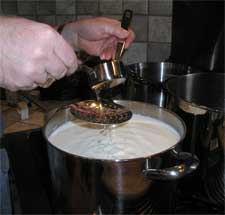
Dilute the rennet (whether tablet or liquid) in 1/4 cup of cool bottled water. Then add to the cultured milk by pouring it through a cheese ladle or strainer.
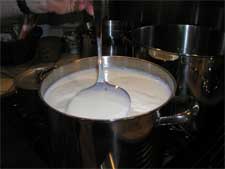
Then gently stir the rennet in with your cheese ladle using bottom-to-top strokes. Do this for about 1 minutes (about 20 strokes) to ensure you get it well combined. Then cover and leave the milk to coagulate according to the recipe. Do not disturb.
Adding the rennet (42 seconds, 1.4MB)
Cutting the curd
Once "set" and a "clean break" is achieved, the curds are cut -- usually into cubes of a specific size -- in order to encourage the curd to separate from the whey. This should be done gently. I use a long kitchen knife and cut the curds into squares (as viewed from the top down), then angle the knife to make diagonal cuts. For harder cheeses, the curds are cut smaller; for softer cheeses, larger. The consistency of the curd before cutting, and the cut curds will determine the final texture of the cheese.
After cutting, the curds can be stirred to further promote separation of curds from whey, although many recipes recommend allowing the cut curds to set for a while before starting the stirring and cooking process.
I don't know for sure that I have the "clean break" down perfectly. And, this picture is small, so may not show it well enough. But, a knife inserted at an angle and then pulled directly upward cuts a clean slice through the curd and the curd does not stick to the knife.
When you have a clean break, cut the curd according to the recipe. I use a long serrated bread knife. I cut clear across the pot in one direction at the size called for, then I cut across the pot in a perpendicular direction so that I have "squares" of cut curd when viewed from the top. Then, I angle my knife at 45° and repeat these cuts to break up the middle of the columns of curd.
Cutting the curds (1:52, 3.7MB)
Stirring the curds ( 1:31, 3MB)
Cooking and stirring
The objective of this step is to further develop acidity and to cause the expulsion of whey from the curd. Not all cheeses undergo this step. Refer to the recipe. Gentleness is called for!
For harder cheeses where cooking and stirring is used, the temperature must be increased very slowly, no more than 2°F every 5 to 7 minutes. The curds should be stirred very slowy and gently to prevent the matting of the curds and to aid in the expulsion of whey from the curds. Once the final cooking temperature is achieved, the curds are usually allowed to set for a time and settle to the bottom of the pot creating a clear separation between the curds and whey. Prior to draining of the whey (which should be saved for whey-based cheeses like Ricotta, or to be used in bread, or even to water garden plants), the curd can be tested for proper consistency by placing some in the palm of your hand. If you squeeze them together, they should mat into a mass and be somewhat firm and resilient, however you should also be able to separate them by agitating them with your thumb or finger.
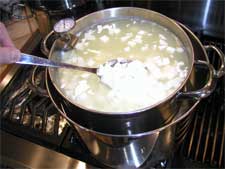
Most recipes call for you to heat the curd while stirring gently to expel whey from the curd and cook it to a proper consistency. While gently stirring, I watch for uncut or oversized curds and gently cut them with my spoon. Heat gently and slowly -- about 2° every 5 minutes until you get to the desired temperature. If you are using a double boiler, it will be easy to overheat the curd, so watch the temperature carefully.
Cooking the curds (54 seconds, 1.8MB)
Washing the curds
This is a step that is only performed on some "washed curd" cheese such as Gouda, Edam, Havart or Colby. This is done by removing about 1/3 of the whey, then adding fresh warm water to the curds. The water should be bottled water that does not contain chlorine and it should be at a specific temperature as called out by the recipe. The curds are then stirred. This step may be repeated several times.
Draining
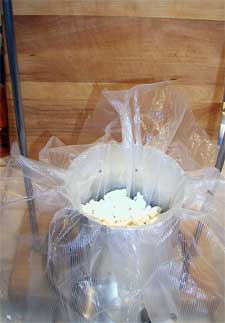
The curds are now drained, usually through a cheese-cloth lined colander until the whey stops dripping.
I usually try to scoop out the curds as much as possible and avoid pouring the curds and whey through the colander. This way, I am not pouring hot whey through the curds and I tend to make much less mess.
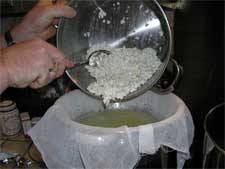
The curds are gently poured into a cheesecloth- or butter muslin-lined colander to drain.
Draining the curds (1:14, 2.5MB)
Cheddaring
Clearly, the cheddaring step only takes place for Cheddar cheeses! In this step, the mass of drained curds are cut into strips and placed back into the pot and "cooked" for about 2 hours, turning every 1/2 hour. These stips of cooked curd are then cut into smaller pieces for the next steps.
Hot water treatment
Again, this step is specific to a few cheeses like Mozzarella and Provolone. These cheeses have a characteristic stretching quality that is obtained by a special hot water treatment usually described in the recipe.
Seasoning
Once drained, the curds are often "milled" -- broken up into small nuggets -- and then have herbs and/or salt added (next step).
If you use fresh herbs, cut them up, put them in some simmering water, simmer for a few minutes, remove from the heat and allow to steep for a while. Add the drained herbs at this step.
Herbs or spices (like ground black pepper), are often sprinkled on the top of fresh goat cheeses rather than mixing them into the curds. You might also see some cheeses with seasonings rubbed into or sprinkled on the rind of harder cheeses.
Some cheeses are smoked for additional flavor, this step would occur after pressing, and maybe even after aging for a while.
Salting
Salt is almost always added by one of two methods. The salt adds flavor, aids in further expulsion of whey, helps with preservation, etc.
A cheese may be salted directly by stirring salt into the milled curds, or by sprinkling the salt on the exterior surfaces of the cheese. Or, it may be salted by allowing the pressed cheese to float in a concentrated brine for some period of time. If brined, the salting step is deferred until after pressing.
Do not used iodized / table salt!
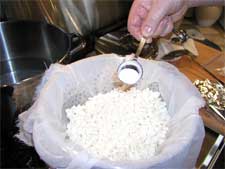
Here is an example of adding cheese salt directly to the drained curds. Add a little salt, then gently combine it with your clean hands, then add a little more, etc.
Many recipes call for putting the cheese in a brine after pressing. Typically you'll brine for 4 to as much as 36 hours. Be sure to turn the cheese occasionally. A brine is a combination of salt and water. I used distilled water. Typically you combine about 2 pounds of salt with one gallon of water for a brine, but check your recipe. I save my brine. I boil it after use and pour it into a 1 gallon milk container which I keep in the refrigerator. I'll use a brine several times before discarding. Remember, use non-iodized salt!
A Manchego cheese is brined. That step always takes place after pressing, so a movie on brining will follow pressing.
Pressing
Hard and semi-hard cheeses are pressed in a cheese press. You can rig up a home-made press or purchase a press. If you plan to make lots of hard cheeses, I recommend the purchase of a press. The pressing helps to expel more whey, to shape the cheese and to create proper consistency and texture.
During pressing, the curds are dressed in cheesecloth, pressed for some period of time at a specific pressure, then removed redressed, turned and repressed. Each recipe calls for a specific sequence of pressures and times.
After pressing, the cheese may require brining (see step from above.)
For "hard" cheeses, you will probably need to press them. Add the drained curds to a cheesecloth-lined mold. I use the plastic non-reusable cheesecloth for this stage.
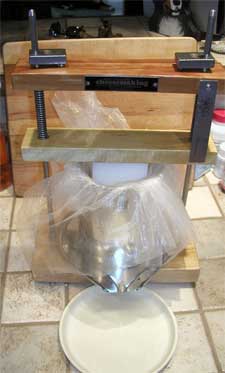
Put the follower (again, covered with cheesecloth) on top of the curds and press at the weight and for the time called out in the recipe.

During the pressing process, you will need to remove the cheese occasionally, turn it over, and redress it in cheesecloth, then repeat pressing. This is done to ensure even pressure to the cheese and to make sure moisture is distributed evenly.
Pressing, part 1 (1:51, 3.4MB)
Pressing, part 2 (1:46, 3.5MB)
Waxing
To properly age some hard cheeses they should be encapsulated in a protective layer of cheese wax. Prior to waxing, the cheese may require several days of air drying. Cheese wax can be purchased from cheese supply businesses. Be careful using wax -- it gets hot and can burn you; and, some waxes are volatile and can catch fire.
I dedicate a pan to holding wax. This red wax is not melted yet, but once it is, the pan isn't good for anything else!
I like to wax my cheese by dipping it. Some people use a natural bristle brush and brush on the melted wax. Dipping uses more wax, but it less messy and gives a nicer looking wax coating.

I like to put my cheese in the fridge for a while before waxing it so it is cool and the wax hardens quickly. First I dip the top and bottom, keeping my fingers out of the hot wax. Then I dips the sides and work my way around the cheese.
Aging
Many cheeses can be eaten fresh, but many benefit from aging. Peak texture and flavor may take many months to achieve. During ripening microbial processes continue and refine the flavor and texture. The main agent at work is the naturally occurring lactic bacteria as well as added cultures and enzymes.
Aging should take place in a controlled environment. Different cheeses required different temperatures and humidities, however I use a small refrigerator that is kept at 55°F and 85% humidity.
During aging, the cheese should be rotated or flipped periodically to prevent moisture from settling in the cheese and to prevent an inconsistent internal consistency.
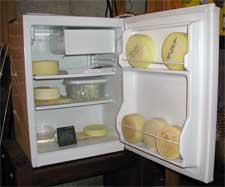
The "mini fridge" in the basement where I age my cheeses. It can hold 12-15 home made cheeses at 55°F and about 85% humidity.
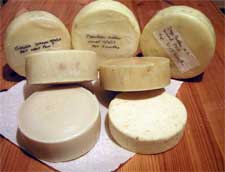
A few of my early cheeses. The ones in back are waxed, the others are forming natural rinds.
Brining & aging (2:03, 4MB)